Construction Process Step by Step: Guide From Planning to Completion
Introduction
Building a house or commercial property is one of the biggest investments you'll make in your lifetime. Whether you're a first-time homeowner, property investor, or developer, understanding the complete construction process helps you make informed decisions, avoid costly mistakes, and ensure your project finishes on time and within budget.
What is the Construction Process?
The construction process is the systematic series of activities and stages involved in building a structure from the ground up. It starts with land selection and planning, moves through design and engineering, continues with actual building work, and ends with final inspection and handover. Each phase has specific tasks, timelines, and quality checkpoints that must be completed before moving to the next stage.
In Nepal, the construction process follows both international building standards and local regulations set by municipal authorities. Whether you're building a residential home in Kathmandu, Pokhara, or Chitwan, or developing commercial property in emerging cities, understanding each construction stage ensures your project meets safety codes, earthquake-resistant standards, and legal requirements.
Why Understanding Construction Stages Matters for Homeowners and Investors
Knowing the construction process helps you:
- Control costs effectively: Understand where your money goes at each stage and identify areas to save without compromising quality
- Monitor progress accurately: Track whether your contractor is following the proper sequence and meeting deadlines
- Avoid construction delays: Anticipate potential bottlenecks and plan material procurement in advance
- Ensure quality standards: Know what to inspect at each phase to catch problems early before they become expensive fixes
- Make informed decisions: Choose the right materials, designs, and technologies that fit your budget and requirements
- Communicate better with contractors: Speak the same technical language and ask the right questions during site visits
Overview of Residential and Commercial Construction in Nepal
Nepal's construction sector has grown significantly in recent years, with modern building techniques replacing traditional methods. The industry now uses advanced materials like ready-mix concrete, steel reinforcement, UPVC windows, and waterproofing membranes that improve building durability and longevity.
Residential construction in Nepal typically includes single-family homes, apartment buildings, and housing complexes. Most urban residential projects follow reinforced concrete frame structures with brick masonry walls, designed to withstand earthquakes according to NBC (Nepal National Building Code) standards.
Commercial construction covers office buildings, shopping centers, hotels, hospitals, and industrial facilities. These projects require more complex structural design, higher load-bearing capacity, advanced MEP (mechanical, electrical, plumbing) systems, and compliance with fire safety regulations.
The typical construction timeline for a standard residential house in Nepal ranges from 8 to 14 months, depending on size, design complexity, and weather conditions. Commercial projects usually take longer, from 12 months to several years for large developments.
Construction costs vary by location, material choices, and finishing quality. As of 2024-2025, average residential construction costs in major Nepali cities range from Rs. 2,500 to Rs. 5,000 per square foot for standard finishes, and Rs. 5,000 to Rs. 10,000+ per square foot for premium finishes with imported materials.
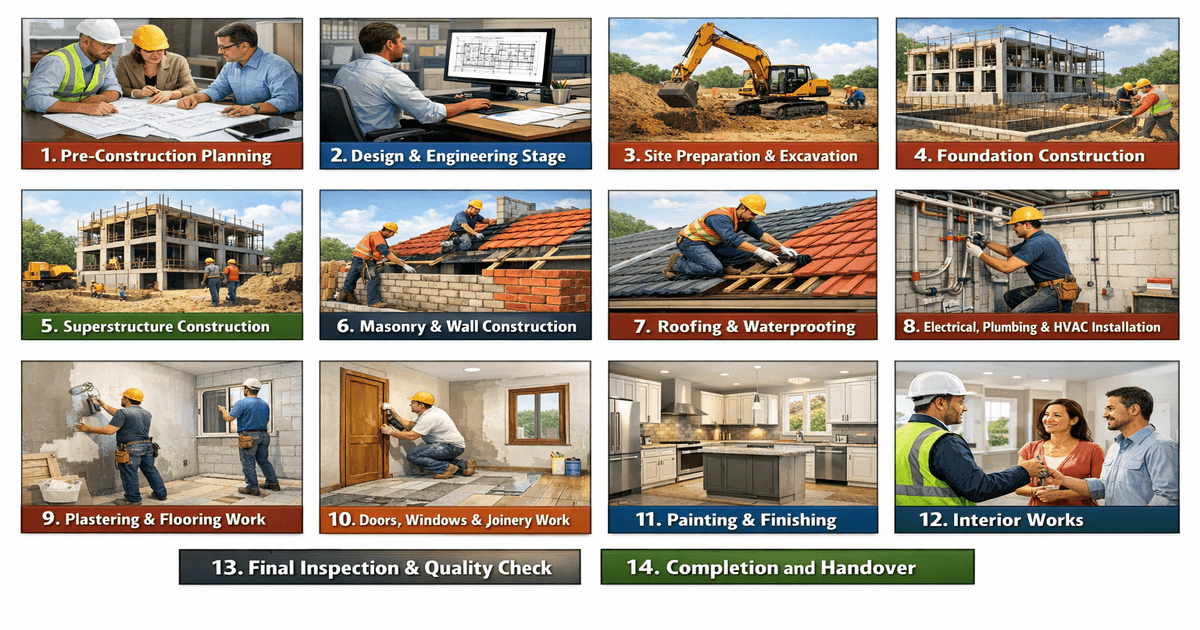
Now let's dive into each stage of the construction process in detail.
1. Pre-Construction Planning
Pre-construction planning is the foundation of any successful building project. This initial phase involves critical decisions about land, budget, design, and legal compliance. Rushing through or skipping steps during planning leads to costly changes, delays, and legal issues later.
1.1 Land Selection and Legal Verification
Choosing the right land and verifying its legal status protects you from future disputes and ensures your construction complies with local regulations.
Land Ownership Check
Before purchasing land or starting construction, verify clear ownership through these steps:
- Obtain the land ownership certificate (Lalpurja) from the Land Revenue Office
- Check the seller's identity matches the ownership documents
- Verify there are no pending court cases or legal disputes on the property
- Confirm the land boundaries match the actual plot using old survey records
- Check for any mortgages, loans, or encumbrances on the land
- Review the chain of ownership (Dharma Patraharu) for the last 20-30 years
Hire a licensed surveyor to measure and mark the exact boundaries to avoid neighbor disputes during construction.
Zoning Rules and Building Bylaws
Every municipality in Nepal has specific zoning regulations that control what type of building you can construct and how much of the land you can build on. Key zoning considerations include:
- Land use classification: Residential, commercial, mixed-use, industrial, or agricultural zones
- Building coverage ratio: Maximum percentage of land you can cover with the building footprint (typically 50-70%)
- Floor area ratio (FAR): Total floor area allowed compared to plot size
- Building height restrictions: Maximum floors or height allowed in your area
- Setback requirements: Minimum distance from property boundaries (front, back, and sides)
- Road access: Minimum road width required for construction approval
- Parking requirements: Mandatory parking spaces based on building size and use
Visit your local municipal office or ward office to obtain the official building bylaws document for your area. These regulations prevent unauthorized construction and ensure proper urban planning.
Soil Testing and Land Survey
Soil testing is crucial for determining the load-bearing capacity of the ground and designing the proper foundation. A geotechnical investigation includes:
- Soil bore test: Drilling to check soil layers, composition, and strength at different depths
- Bearing capacity test: Determines how much weight the soil can support per square meter
- Water table level: Identifies groundwater depth which affects foundation design and waterproofing
- Soil composition analysis: Tests for clay, sand, rock, or other materials that impact foundation type
- Chemical testing: Checks for harmful substances that might corrode concrete or steel
Professional land surveyors also conduct a topographic survey to map elevation changes, existing structures, trees, and drainage patterns on your plot. This information helps architects design a building that works with the natural landscape rather than fighting against it.
Expect to spend Rs. 25,000 to Rs. 100,000 for comprehensive soil testing and land surveying, depending on plot size and complexity. This investment prevents foundation failures that could cost millions to repair later.
1.2 Budget Estimation and Cost Planning
Accurate budget planning helps you secure adequate financing and prevents running out of money mid-construction. A realistic construction budget includes all direct costs, indirect costs, and a contingency fund for unexpected expenses.
Construction Cost Per Sq Ft in Nepal
Construction costs vary significantly based on location, material quality, labor rates, and finishing standards. Here's a breakdown of typical costs per square foot in Nepal (2024-2025 estimates):
Basic/Economy Construction (Rs. 2,500 - Rs. 3,500 per sq ft)
- Standard cement and brick materials
- Local tiles and basic fixtures
- Simple plaster and paint finishes
- Basic electrical and plumbing
- Minimal architectural features
Standard/Mid-Range Construction (Rs. 3,500 - Rs. 5,000 per sq ft)
- Good quality materials
- Vitrified tiles and decent fixtures
- Smooth finish plaster and quality paint
- Concealed wiring and modern plumbing
- Some decorative elements
Premium Construction (Rs. 5,000 - Rs. 7,500 per sq ft)
- Branded materials and fittings
- Imported tiles and premium fixtures
- Designer finishes and textures
- Smart home electrical systems
- Architectural details and false ceilings
Luxury/High-End Construction (Rs. 7,500 - Rs. 10,000+ per sq ft)
- Imported premium materials
- Marble flooring and luxury fittings
- Custom finishes and designer elements
- Home automation systems
- Extensive landscaping and amenities
These rates typically include materials, labor, and contractor margins but may exclude land cost, design fees, government fees, and furniture.
Material Price Forecasting
Material costs fluctuate based on market conditions, import duties, fuel prices, and seasonal demand. Plan your material procurement strategy:
- Bulk purchasing: Buy materials like cement, steel, and bricks in bulk when prices are low
- Local vs. imported: Compare quality and cost of local versus imported materials
- Price trends: Monitor construction material price indices and buy before anticipated increases
- Supplier relationships: Build good relationships with suppliers for better prices and payment terms
- Alternatives: Consider substitute materials that offer similar quality at lower costs
Major materials that impact your budget include cement, steel reinforcement bars (rebars), bricks or blocks, sand, aggregates, tiles, paint, doors, windows, electrical wiring, and plumbing pipes.
Labor Cost Planning
Labor typically accounts for 30-40% of total construction costs in Nepal. Labor rates vary by skill level, location, and project complexity:
- Skilled labor: Masons, carpenters, plumbers, electricians, steel fixers
- Semi-skilled labor: Helpers, painters, plasterers
- Unskilled labor: General construction workers
Labor rates are higher in Kathmandu Valley compared to other regions. Factor in:
- Daily wage rates by trade
- Overtime costs for urgent work
- Accommodation and meals if workers live on-site
- Insurance and safety equipment
- Skilled specialist labor for complex tasks
Consider whether to hire labor directly or through a contractor. Direct hiring gives you more control but requires more management time, while contractors handle labor management but charge a markup.
1.3 Architectural Design and Layout
Good architectural design creates functional, comfortable spaces that meet your needs while staying within budget and complying with regulations.
Floor Planning
Floor planning involves organizing rooms, circulation spaces, and functional areas to create an efficient and livable layout. Consider:
- Room sizes and proportions: Adequate space for furniture and movement
- Natural light and ventilation: Windows and openings for each room
- Privacy zones: Separate public areas (living room) from private areas (bedrooms)
- Future flexibility: Design that can adapt to changing needs
- Circulation flow: Efficient movement between rooms without wasted corridor space
- Vastu principles: If important to you, incorporate directional guidelines
- Storage planning: Built-in wardrobes, kitchen cabinets, and utility areas
Work with an experienced architect who understands both modern design and local building practices in Nepal.
3D Design and Structural Drawings
Modern architectural design uses 3D modeling software to visualize the building before construction starts. This helps you:
- See exactly how rooms will look and feel
- Make design changes easily before construction begins
- Communicate your vision clearly to contractors
- Identify potential design problems early
- Create impressive presentations for loan approval or investor pitches
Complete architectural drawings include:
- Site plan showing building location on the plot
- Floor plans for each level
- Elevation drawings showing exterior appearance from all sides
- Section drawings showing internal vertical arrangement
- Detailed drawings for staircases, bathrooms, kitchen, etc.
- Door and window schedules
- Electrical and plumbing layouts
Approval from Municipality
In Nepal, you must obtain building approval from your local municipality before starting construction. The approval process includes:
- Submit application: Fill out the building permit application form with your municipality
- Attach documents:
- Land ownership certificate (Lalpurja)
- Citizenship certificate
- Tax clearance certificate
- Architectural drawings signed by licensed architect
- Structural drawings signed by licensed engineer
- Site plan
- Pay fees: Building approval fees based on covered area
- Wait for inspection: Municipal inspector visits the site
- Receive approval: Get the official building permit (Naksha Pass)
The approval process typically takes 15 to 45 days depending on the municipality and whether any revisions are needed. Do not start construction without approval, as municipalities can issue stop-work orders and impose penalties for unauthorized construction.
2. Design and Engineering Stage
The engineering stage translates architectural designs into technical specifications that ensure the building is safe, stable, and meets all structural requirements. This phase involves detailed calculations and planning by licensed structural engineers.
2.1 Structural Design
Structural design determines how the building will stand up and resist forces like gravity, earthquakes, wind, and live loads from people and furniture.
Column, Beam, Slab and Foundation Design
The structural engineer designs the building's skeleton based on:
- Load calculations: Dead loads (weight of building materials), live loads (people, furniture), and environmental loads (wind, earthquake)
- Column design: Vertical elements that carry loads from roof to foundation; size, spacing, and reinforcement details
- Beam design: Horizontal elements that transfer loads from slabs to columns; dimensions and steel reinforcement requirements
- Slab design: Horizontal floor and roof surfaces; thickness, reinforcement pattern, and concrete grade
- Foundation design: Below-ground structure that transfers building weight to soil; type (isolated footings, combined footings, raft foundation, pile foundation) based on soil bearing capacity
The engineer produces detailed structural drawings showing:
- Reinforcement bar (rebar) sizes, quantities, and placement
- Concrete grade specifications (M15, M20, M25, etc.)
- Connection details between structural elements
- Construction sequence and special instructions
Earthquake Resistant Design Standards
Nepal is in a high seismic zone, making earthquake-resistant design mandatory. The Nepal National Building Code (NBC) provides guidelines for:
- Ductile detailing: Special reinforcement arrangements that allow structures to bend without collapsing during earthquakes
- Structural configuration: Avoiding irregular shapes, soft stories, and other features that perform poorly in earthquakes
- Foundation anchoring: Proper connection between foundation and superstructure
- Quality materials: Minimum concrete and steel grades for structural safety
- Construction practices: Proper mixing, placing, and curing of concrete
Licensed structural engineers must follow NBC 201, NBC 202, and NBC 205 codes for residential and commercial buildings. These standards have been updated after the 2015 earthquake to improve building safety.
Key earthquake-resistant features include:
- Proper beam-column joints with sufficient stirrups
- Adequate lap lengths for reinforcement bars
- Band beams at each floor level to tie the structure together
- Symmetrical building layout to avoid torsion effects
- Shear walls in tall buildings for lateral stability
2.2 Electrical, Plumbing and HVAC Planning
MEP (Mechanical, Electrical, Plumbing) planning ensures your building has proper utilities infrastructure that's efficient, safe, and easy to maintain.
Electrical Wiring Layout
Electrical design includes:
- Load calculation: Total electrical load based on appliances, lighting, and equipment
- Main panel sizing: Circuit breaker capacity for total load plus future expansion
- Circuit planning: Separate circuits for heavy appliances, lighting, outlets
- Lighting design: Location and type of light fixtures for each room
- Outlet placement: Sufficient power points in convenient locations
- Special circuits: Dedicated lines for air conditioners, water heaters, kitchen appliances
- Safety devices: Earth leakage circuit breakers (ELCB), residual current devices (RCDs)
- Communication systems: TV, internet, telephone cabling
- Security systems: CCTV cameras, alarm systems, intercom
Modern electrical design uses concealed conduit systems where pipes are embedded in walls before plastering, giving a clean finished look. Plan electrical layouts during the design stage because changing them after construction is expensive.
Water Supply and Drainage Design
Plumbing design covers:
- Water supply system: Pipe sizing, water tank capacity, pump requirements, distribution to all fixtures
- Hot water system: Water heater location, hot water pipe runs
- Drainage system: Waste pipe sizes, slope requirements, inspection chambers, septic tank or sewer connection
- Rainwater drainage: Roof drainage, downpipes, storm water disposal
- Fixture locations: Sinks, toilets, showers, washing machine connections
- Water treatment: Filtration systems if needed
Proper drainage design prevents water accumulation, bad odors, and structural damage from moisture. All drainage pipes must have proper slope (1:40 to 1:60) to ensure waste flows smoothly.
Solar and Energy Saving Planning
Energy-efficient design reduces long-term electricity costs and environmental impact:
- Solar water heating: Solar panels on roof to heat water naturally
- Solar electricity (photovoltaic): Solar panels to generate electricity; especially useful given frequent power cuts in Nepal
- Natural lighting: Skylights, light tubes, and proper window placement to reduce daytime lighting needs
- Natural ventilation: Cross-ventilation design to reduce air conditioning needs
- Insulation: Roof and wall insulation to maintain comfortable indoor temperatures
- LED lighting: Energy-efficient lights throughout the building
- Energy-efficient appliances: Plan for star-rated electrical equipment
Solar water heaters are very popular in Nepal and typically pay for themselves in 2-3 years through electricity savings. Consult with solar installation specialists during the design stage to integrate solar systems properly.
3. Site Preparation and Excavation
Site preparation transforms raw land into a ready-to-build construction site. This stage involves clearing, excavation, and setting up site facilities.
Land Clearing
Before excavation begins:
- Remove all vegetation, trees, bushes, and grass from the building area
- Demolish any existing structures or portions that need to be removed
- Clear debris, garbage, and obstacles from the site
- Remove topsoil (upper 15-30 cm layer) which contains organic matter unsuitable for construction
- Store topsoil separately if you plan to use it later for landscaping
- Level the site roughly to identify low and high points
Protect any trees or features you want to keep by fencing them off from the construction zone.
Excavation for Foundation
Excavation involves digging the ground to reach the proper depth for foundations:
- Mark excavation boundaries using survey stakes and strings based on architectural drawings
- Excavate to the depth specified by structural drawings (typically 1.2 to 3 meters below ground level)
- Keep excavation sides stable; shore up loose soil to prevent collapse
- Ensure excavation extends beyond column/wall footprints to provide working space
- Check excavation depth against the good bearing strata identified in soil testing
- Remove excavated soil to a safe location away from the working area
- Keep excavation dry by providing drainage channels if needed
For buildings with basements, excavation goes much deeper and may require specialized equipment and shoring systems. In loose or waterlogged soil, you may need to dewater the excavation using pumps.
Setting Boundary and Level Marking
Accurate marking ensures the building is constructed in the correct location and at proper elevations:
- Boundary marking: Mark property lines clearly to ensure setback compliance
- Center line marking: Establish center lines for all columns and walls using theodolite or total station
- Level benchmarks: Set up reference points for measuring heights and depths throughout construction
- Batter boards: Install temporary wooden frames outside the excavation area to maintain reference lines
Professional surveyors should verify these markings before foundation work begins. Even small errors in positioning at this stage can cause serious problems later.
4. Foundation Construction
The foundation is the most critical part of your building because it transfers all loads safely into the ground. Foundation problems are extremely expensive to fix later, so quality work here is essential.
Footing Work
Footings are enlarged bases below columns or walls that spread the load over a larger soil area:
- Excavate individual column footing pits or continuous wall footing trenches to specified depth
- Level and compact the bottom of excavations
- Place a layer of lean concrete (PCC - Plain Cement Concrete) 50-75mm thick as a base
- Allow PCC to cure before placing reinforcement
- Fabricate and place reinforcement steel bars according to structural drawings
- Maintain proper concrete cover (50-75mm) below reinforcement using cover blocks
- Ensure correct bar spacing, lap lengths, and ties
- Check reinforcement work against drawings before concrete pouring
PCC and RCC Foundation
Foundation construction proceeds in layers:
- PCC (Plain Cement Concrete) layer: Lean concrete mix (usually M10 or M15 grade) that provides a clean, level surface for main foundation work
- RCC (Reinforced Cement Concrete) footing: Structural concrete (M20 or M25 grade) with reinforcement that forms the actual foundation element
Key quality points:
- Use good quality cement (OPC 43 or 53 grade)
- Maintain correct concrete mix proportions or use ready-mix concrete for consistency
- Pour concrete continuously without long delays to avoid cold joints
- Vibrate concrete properly to remove air pockets and ensure full compaction
- Cure concrete for at least 7 days by keeping it moist
- Protect fresh concrete from direct sunlight and rain
- Don't load the foundation until concrete achieves sufficient strength (usually 7-14 days)
Anti-Termite and Waterproof Treatment
Protecting the foundation from termites and water damage adds years to your building's life:
Anti-termite treatment:
- Apply chemical anti-termite solution to soil before PCC
- Create a chemical barrier around and under the foundation
- Apply treatment to filled-in areas near foundation walls
- Treat all contact points between soil and wooden elements
- Use licensed pest control companies for quality treatment
Waterproofing:
- Apply bitumen-based waterproofing to external faces of foundation walls below ground level
- Install drainage layer (gravel or drainage board) against foundation walls
- Slope ground away from the building to direct surface water away
- Install drainage pipes (weep holes) if needed to relieve hydrostatic pressure
- Waterproof basement slabs and walls if building has a basement
Termite treatment costs are minimal compared to structural damage from termite infestation, and waterproofing prevents dampness issues that affect indoor air quality and finish materials.
5. Superstructure Construction
The superstructure is the visible portion of the building above ground level. This stage involves constructing columns, beams, and slabs that form the building's structural frame.
5.1 Column and Beam Work
Columns and beams create the skeleton that supports everything else in the building.
Reinforcement Placement
Quality reinforcement work is critical for structural integrity:
Column reinforcement:
- Use correct diameter bars as specified (typically 12mm, 16mm, 20mm, or 25mm)
- Maintain proper number of vertical bars (usually minimum 4 bars)
- Space lateral ties/stirrups as per design (typically 100-150mm spacing)
- Provide extra ties near beam-column joints
- Ensure vertical bars extend properly into footings below and beams above
- Maintain specified lap length (usually 40 times bar diameter)
- Use spacers or cover blocks to maintain concrete cover (usually 40mm)
Beam reinforcement:
- Place bottom bars (tension reinforcement) correctly
- Position top bars at supports where needed
- Install stirrups at specified spacing (closer spacing near supports)
- Ensure proper anchorage at beam ends
- Maintain adequate cover to all reinforcement
Check reinforcement work carefully before concrete pouring because mistakes cannot be corrected later.
Concrete Pouring
Proper concreting technique ensures strong, durable structural elements:
- Pour columns and beams on the same day or in proper sequence per structural drawings
- Use appropriate concrete grade (typically M20 or M25 for residential buildings)
- Pour concrete from reasonable height to prevent segregation (maximum 1.5 meters)
- Use mechanical vibrators to compact concrete thoroughly without over-vibrating
- Pour columns in layers if they are tall, consolidating each layer before adding the next
- Don't add water to concrete after mixing (reduces strength)
- Finish exposed surfaces smoothly
- Begin curing immediately after initial setting (usually 4-6 hours after pouring)
Ready-mix concrete vs. site-mixed concrete:
- Ready-mix ensures consistent quality and saves time but costs more
- Site mixing gives flexibility but requires good quality control
- For critical structural elements, ready-mix is recommended
5.2 Slab Casting
Slabs are horizontal structural elements that form floors and roofs.
Roof Slab
Roof slab construction follows these steps:
- Formwork (shuttering): Install wooden or metal formwork supported by props/jacks to hold fresh concrete
- Check formwork levels: Ensure formwork is level and at correct height with proper camber if designed
- Reinforcement placement:
- Place bottom layer of bars in both directions
- Install spacer bars (chairs) to support top reinforcement layer
- Place top layer of bars
- Maintain proper spacing and cover
- Electrical and plumbing: Embed conduits and pipes as per design before concreting
- Concrete pouring:
- Pour and spread concrete evenly across entire slab area
- Vibrate thoroughly to remove air voids
- Level and finish surface smoothly
- Apply curing compound or cover with wet burlap immediately
Common slab types in Nepal:
- One-way slabs: Reinforcement in one direction for narrow spans
- Two-way slabs: Reinforcement in both directions for squarish panels
- Flat slabs: Direct column-to-slab connection without beams (for modern designs)
Staircase Slab
Staircases are challenging to construct because of their inclined nature:
- Build staircase formwork precisely to maintain uniform step dimensions
- Install reinforcement following the slab slope
- Ensure steps are properly supported during construction
- Pour concrete continuously from bottom to top
- Form step nosings carefully for uniform appearance
- Cure properly, as staircases experience high foot traffic
Never remove formwork too early. Slabs need adequate support until concrete reaches sufficient strength:
- Beam bottoms: Minimum 14-21 days
- Slab bottoms: Minimum 7-14 days depending on span
- Slab sides: 2-3 days after pouring
Premature removal of formwork causes sagging, cracking, or even collapse.
6. Masonry and Wall Construction
Once the structural frame is complete, walls fill the spaces between columns and beams to enclose rooms and provide privacy.
Brick and Block Masonry
Wall construction using bricks or blocks:
Material selection:
- Clay bricks: Traditional choice; good thermal and sound insulation; available in different grades
- Cement blocks: Lighter than bricks; faster construction; requires plastering
- AAC (Autoclaved Aerated Concrete) blocks: Lightweight; excellent insulation; earthquake friendly but more expensive
Construction process:
- Soak bricks in water before laying to prevent them from absorbing moisture from mortar
- Use proper mortar mix (usually 1:6 cement:sand ratio for load-bearing walls, 1:4 for partition walls)
- Lay bricks in running bond pattern (overlap pattern) for strength
- Maintain vertical plumb using plumb bob and spirit level
- Keep bed joints (horizontal) and vertical joints uniform thickness (10-12mm)
- Fill all joints completely with mortar
- Clean excess mortar immediately
- Cure walls by sprinkling water for 7-10 days
- Build walls up to maximum 1-1.5 meters height per day to prevent collapse
Key quality points:
- Don't build walls directly on soil; they must rest on foundation beams or plinths
- Connect walls to columns using starter bars or wall ties for earthquake resistance
- Leave small gaps at top of walls (20-25mm) before beams; fill with mortar after wall settling
- Provide openings for doors, windows, and utilities as per architectural drawings
- Install lintels (horizontal beams) above door and window openings
Partition Wall Installation
Partition walls divide interior space and don't carry structural loads:
Types of partition walls:
- Brick/block partitions: Traditional masonry in reduced thickness (115mm/100mm)
- Gypsum board partitions: Metal frame with gypsum board sheets; quick installation
- Glass partitions: For modern offices and bathrooms; provides light transmission
- Ply/cement board partitions: Lightweight and cost-effective
Partition walls can be built after the structure is complete, allowing flexibility in interior layout. Use lightweight materials for partitions on upper floors to reduce dead load.
Install door frames in partition walls ensuring they are vertical, level, and properly anchored. Leave gap for electrical conduits and plumbing pipes where needed.
7. Roofing and Waterproofing
The roof protects the entire building from rain, sun, and weather elements. Proper roofing and waterproofing are essential to prevent water damage and ensure comfort.
Roof Slab Curing
After casting the roof slab, proper curing develops concrete strength and prevents cracking:
- Start curing within 4-6 hours after concrete finishing
- Keep slab surface continuously moist for at least 14 days
- Use water ponding method (most effective): Create small bunds around slab perimeter and flood surface with water
- Alternatively, cover with wet burlap sacks and keep them damp
- Protect from direct sunlight during curing period
- Don't allow foot traffic on slab for at least 7 days
- Don't apply any loads or start further construction for 14-21 days
Inadequate curing significantly reduces concrete strength and causes surface cracks that lead to water seepage.
Terrace Waterproofing
Roof waterproofing prevents water infiltration that causes leakage, dampness, and structural damage:
Waterproofing methods in Nepal:
- Bitumen-based coating: Traditional method using coal tar or bitumen felt sheets
- Cost-effective
- Requires periodic reapplication (every 3-5 years)
- Black surface absorbs heat
- Cementitious coating: Polymer-modified cement coating
- Easy to apply
- Can be painted over
- Good for occupied buildings (non-toxic application)
- Liquid membrane: Polyurethane or acrylic liquid applied with roller/brush
- Creates seamless waterproof layer
- Flexible and crack-resistant
- More expensive but long-lasting
- APP/SBS membrane sheets: Torch-applied modified bitumen sheets
- Professional application required
- Excellent waterproofing for 10-15 years
- Higher initial cost
Waterproofing process:
- Ensure roof surface is clean, dry, and free of loose particles
- Fill all cracks and surface irregularities
- Apply primer coat (if required by waterproofing system)
- Apply waterproofing material as per manufacturer specifications
- Pay special attention to corners, junctions, and penetrations (pipes, vents)
- Provide positive drainage slope towards outlets (minimum 1:80 slope)
- Install overflow drainage as backup for heavy rainfall
- Protect finished waterproofing with tiles or screed if needed
Test waterproofing by flooding the roof with water for 24-48 hours and checking for leaks in rooms below.
Heat Insulation
Roof insulation reduces heat transfer, keeping interior spaces cooler in summer and warmer in winter:
Insulation methods:
- Brick bat coba: Traditional method using broken brick pieces in mortar (100mm thick layer)
- Expanded polystyrene (EPS) boards: Lightweight foam boards laid on waterproofing
- Extruded polystyrene (XPS) boards: Higher density and better insulation than EPS
- Reflective foil insulation: Reflects radiant heat; useful in hot climates
- False ceiling with insulation: Insulation material above false ceiling
Insulation significantly reduces air conditioning costs and improves indoor comfort, especially in top-floor units.
8. Electrical, Plumbing and HVAC Installation
With the structure and walls complete, internal systems installation begins. This work happens before plastering so pipes and wires can be embedded within walls and floors.
Concealed Wiring
Modern buildings use concealed electrical wiring hidden inside walls and ceilings:
Installation process:
- Cut chases (grooves) in walls along planned wire routes using wall chasers or chisels
- Install PVC conduit pipes in chases
- Run pipes from switchboards to all outlet points, light points, and appliances
- Ensure conduits have smooth bends (no sharp angles) for easy wire pulling
- Test conduits by pulling a dummy wire through before wall plastering
- After plastering dries, pull electrical wires through conduits
- Use color-coded wires: red/brown for live, blue for neutral, green/yellow for earth
- Make proper connections at switchboards and outlets
- Test all circuits before energizing
- Label circuits clearly in the distribution board
Safety requirements:
- Use ISI-marked wires and MCBs (miniature circuit breakers)
- Install ELCB/RCCB for shock protection
- Provide separate earth connection to all outlets
- Use adequate wire gauge for the load (don't overload circuits)
- Maintain clearances from water pipes and gas lines
Plumbing Pipelines
Water supply and drainage systems must be installed before floor and wall finishes:
Water supply installation:
- Use appropriate pipe material:
- CPVC (Chlorinated PVC): Good for hot and cold water; commonly used in Nepal
- PEX (Cross-linked polyethylene): Flexible; easier installation; more expensive
- PPR (Polypropylene Random): Durable; heat-welded joints; increasingly popular
- GI (Galvanized Iron): Traditional but prone to corrosion; being phased out
- Run pipes through walls where possible to minimize exposed piping
- Provide shutoff valves at key locations for maintenance
- Install air valves at high points to prevent air locks
- Slope horizontal pipes slightly towards drainage to facilitate complete drainage during repairs
- Pressure-test water lines before concealing in walls (typically 1.5 times working pressure)
- Insulate hot water pipes to reduce heat loss
Drainage System Setup
Proper drainage prevents sewer gas entry, blockages, and water backup:
Key principles:
- Use correct pipe sizes:
- WC (toilet): 100mm or 110mm
- Wash basin, kitchen sink: 50mm
- Floor drains: 50mm
- Main stack: 100mm or 110mm
- Maintain minimum slope: 1:60 for 100mm pipes, 1:40 for 50mm pipes
- Install P-traps or S-traps under all fixtures to prevent odor
- Provide inspection chambers (IC) at junctions and direction changes for future cleaning
- Ensure soil pipes (from toilets) and waste pipes (from other fixtures) connect properly
Don't make sharp bends; use proper fittings
- Test drainage system with water before covering
Ventilation pipes:
- Extend main drainage stack above roof level for ventilation
- This prevents vacuum in pipes that would slow drainage
- Also allows sewer gases to escape safely
Septic Tank vs. Sewer Connection:
- If municipal sewer available: Connect directly after obtaining permission
- If no sewer: Construct septic tank of adequate size (design capacity based on number of users)
- Septic tank must be watertight and located away from water sources
- Provide soak pit for septic overflow (where soil conditions permit)
9. Plastering and Flooring Work
Plastering and flooring give the building its finished surface and prepare it for final decorative work.
Internal and External Plaster
Plastering creates smooth, even wall and ceiling surfaces:
Plastering process:
- Surface preparation:
- Clean wall surface of dust, loose mortar, and oil marks
- Dampen surface before plastering
- Cover electrical conduits and plumbing pipes
- Applying plaster:
- Mix cement and sand mortar (typically 1:4 or 1:5 ratio)
- Apply first coat (dubbing coat) 12-15mm thick to fill irregularities
- Score surface with comb while plastic for good bonding of next coat
- After dubbing sets, apply finishing coat 6-8mm thick
- Use straight edge to ensure flat surface
- Finish with wooden float for smooth texture
- Curing:
- Keep plaster damp for 7 days
- Prevents cracking and improves strength
External plaster:
- Use richer mortar mix (1:4) for weather resistance
- Add waterproofing compound for moisture protection
- Apply textured or rough finish for better appearance and water runoff
- Use external grade materials
Internal plaster:
- Smooth finish suitable for painting
- Thinner coats for precision
- Pay extra attention to corners, edges, and junctions
Quality checks:
- Check plumb (vertical alignment) frequently with plumb bob
- Ensure surfaces are flat without waves or bulges
- Maintain uniform thickness throughout
- Check for hollow sounds indicating poor bonding
Tile, Marble and Wooden Flooring
Flooring choice impacts appearance, comfort, maintenance, and cost:
Ceramic/Vitrified Tiles (Most common in Nepal):
- Wide variety of designs and sizes
- Durable and easy to clean
- Cost: Rs. 35-150 per sq ft for local tiles; Rs. 150-500+ for imported tiles
- Installation:
- Ensure base surface is level
- Apply tile adhesive or cement mortar
- Lay tiles with uniform gaps using spacers
- Check level continuously
- Fill joints with grout after 24 hours
- Clean surface and allow curing
Marble/Granite (Premium finish):
- Natural stone with unique patterns
- Elegant appearance
- Requires periodic polishing
- Cost: Rs. 150-600+ per sq ft depending on variety
- Must be sealed to prevent staining
Wooden Flooring:
- Engineered wood: Rs. 200-500 per sq ft; more stable than solid wood
- Laminate flooring: Rs. 80-250 per sq ft; budget-friendly wood-look option
- Solid hardwood: Expensive but can be sanded and refinished multiple times
- Requires level, dry subfloor
- Not recommended for bathrooms and wet areas
Other options:
- Vinyl flooring: Economical and water-resistant
- Bamboo flooring: Eco-friendly and durable
- Concrete polish: Modern industrial look
Floor installation tips:
- Start from center of room and work outwards
- Plan tile layout to minimize small cut pieces
- Maintain consistent joint widths
- Use floor leveling compound if base surface is uneven
- Allow adhesive to cure fully before walking on floor (usually 24-48 hours)
10. Doors, Windows and Joinery Work
Doors and windows provide security, light, ventilation, and aesthetic appeal. Quality installation is important for smooth operation and weatherproofing.
UPVC, Aluminum and Wooden Frames
UPVC (Unplasticized Polyvinyl Chloride):
- Advantages: Maintenance-free, termite-proof, good insulation, weatherproof, affordable
- Disadvantages: Cannot be repaired if damaged, limited color options
- Cost: Rs. 350-650 per sq ft
- Best for: Most windows and some doors; very popular in Nepal
Aluminum:
- Advantages: Strong, lightweight, slim profiles, durable, modern appearance
- Disadvantages: Conducts heat/cold, requires thermal break for better insulation
- Cost: Rs. 450-850 per sq ft
- Best for: Large windows, sliding doors, commercial buildings
- Powder coating available in many colors
Wooden frames:
- Advantages: Traditional appearance, natural insulation, can be customized, repairable
- Disadvantages: Requires maintenance, susceptible to termites and weather damage, expensive
- Cost: Rs. 500-1500+ per sq ft depending on wood type (sal, teak, hardwood)
- Best for: Main entrance doors, traditional architecture
Glass options:
- Single glazing: Standard glass; economical
- Double glazing: Two glass panes with air gap; better insulation and sound reduction
- Toughened glass: Stronger and safer; required for large panels
- Laminated glass: Safety glass with plastic interlayer
- Tinted/reflective glass: Reduces heat and glare
Installation process:
- Take precise measurements of openings
- Order frames with sufficient lead time (usually 2-4 weeks for custom sizes)
- Check frames upon delivery for damage and correct dimensions
- Install frames in openings using anchor fasteners
- Ensure frames are level and plumb
- Seal gaps between frame and wall with expanding foam
- Install glass panels (if not pre-installed)
- Fit hardware (handles, locks, hinges)
- Apply weatherstripping for better sealing
- Test operation before final acceptance
Main Door Installation
The main entrance door requires special attention:
- Use solid wood or steel door for security
- Install high-quality locks (mortise lock plus night latch)
- Ensure proper door leaf thickness (40-45mm minimum)
- Check for smooth operation without binding or gaps
- Install door viewer (peephole) for security
- Consider adding decorative elements as per design
- Weatherstrip around door perimeter
- Install door stopper to prevent wall damage
Security features:
- Multi-point locking system
- Reinforced strike plate with long screws
- Door chain or security bar
- Smart locks (optional) with keypad or biometric access
11. Painting and Finishing
Painting transforms the building from a construction site into a finished, livable space. Quality painting requires proper surface preparation and good-quality materials.
Wall Putty and Primer
Before painting, walls need preparation for a smooth finish:
Wall putty:
- White cement-based filler applied over plaster
- Fills minor imperfections and pores in plaster
- Creates ultra-smooth surface for painting
- Application:
- Mix putty powder with water to creamy consistency
- Apply thin first coat with trowel/putty knife
- Let dry for 6-8 hours
- Sand lightly to remove tool marks
- Apply second coat if needed
- Final sanding with fine sandpaper for smooth finish
Primer:
- Sealer coat applied before paint
- Improves paint adhesion and coverage
- Reduces paint absorption into plaster
- Ensures uniform paint finish
- Apply with roller or brush, allow to dry per manufacturer's instructions
Interior and Exterior Paint
Interior paint types:
- Emulsion paint (Most common):
- Water-based acrylic paint
- Easy to apply and clean
- Quick drying
- Available in various finishes: matt, satin, gloss
- Cost: Rs. 180-450 per liter
- Brands: Berger, Asian Paints, Jotun, Nerolac
- Distemper (Budget option):
- Water-based but less durable than emulsion
- Economical for rental properties
- Cost: Rs. 80-150 per liter
- Enamel paint (For wood and metal):
- Oil-based, high-gloss finish
- Durable but slower drying
- Used for doors, windows, railings
Exterior paint requirements:
- Weatherproof formulation
- UV-resistant
- Water-resistant
- Longer-lasting than interior paint
- Texture options: smooth, textured, stone finish
- Cost: Rs. 250-650 per liter
Painting process:
- Protect floors and fixtures with drop cloths
- Fill any cracks or holes
- Sand surfaces smooth
- Apply primer coat
- Apply first coat of paint (allow 4-6 hours drying)
- Lightly sand between coats if needed
- Apply second coat
- Touch up any missed spots
- Remove masking tape while paint is slightly wet
Coverage: One liter typically covers 120-140 sq ft per coat (varies by surface porosity and paint quality)
Texture and Decorative Finishes
Beyond plain paint, decorative finishes add character:
Texture paint:
- Creates 3D surface patterns
- Hides minor wall imperfections
- Available in various designs: stone, sand, rustic
- Applied with special rollers or trowels
- More expensive than regular paint
- Good for accent walls or exteriors
Wall treatments:
- Wallpaper: Wide variety of designs; can be vinyl, fabric, or paper-based
- Wood paneling: Adds warmth; good acoustics
- Stone cladding: Natural or manufactured stone tiles
- POP (Plaster of Paris) designs: Decorative moldings and cornices
- Wall art: Murals, stencils, geometric patterns
Ceiling finishes:
- Smooth painted finish
- Textured finish
- False ceiling with gypsum board
- POP designs and coves
- Exposed beams for modern look
Choose finishes that complement your overall design theme and stay within budget.
12. Interior Works
Interior finishing creates functional and beautiful living spaces with built-in features.
False Ceiling
False ceilings (dropped ceilings/suspended ceilings) serve multiple purposes:
Benefits:
- Hides electrical wiring, pipes, and structural elements
- Improves acoustics
- Enables recessed lighting design
- Provides thermal insulation
- Creates visual interest with multiple levels
Types:
- Gypsum board ceiling:
- Most popular choice
- Smooth finish
- Can be painted any color
- Framework: Metal channels suspended from slab
- Cost: Rs. 150-300 per sq ft
- POP (Plaster of Paris) ceiling:
- Traditional method
- Heavy but very durable
- Good for decorative designs
- Cost: Rs. 200-400 per sq ft
- PVC ceiling:
- Economical
- Moisture-resistant (good for bathrooms)
- Easy maintenance
- Limited design options
- Cost: Rs. 85-150 per sq ft
- Wooden ceiling:
- Premium finish
- Warm, natural appearance
- Expensive and requires maintenance
- Cost: Rs. 400-1200+ per sq ft
- Metal ceiling:
- Commercial spaces
- Easy access to ceiling plenum
- Cost: Rs. 180-400 per sq ft
Installation considerations:
- Leave sufficient plenum space (gap between slab and false ceiling) for electrical and HVAC work
- Ensure level installation
- Provide access panels for maintenance of hidden services
- Use appropriate materials for moisture-prone areas like bathrooms
Kitchen Cabinets
Kitchen cabinets require careful planning for functionality and storage:
Cabinet types:
- Modular kitchen:
- Pre-manufactured standard-sized units
- Quick installation
- Wide range of finishes
- Easy to replace individual units
- Cost: Rs. 800-2500+ per sq ft
- Carpenter-made kitchen:
- Custom-built on-site
- Flexible design
- Uses available space efficiently
- Quality depends on carpenter skill
- Cost: Rs. 600-1500 per sq ft
Materials:
- MDF (Medium Density Fiberboard): Economical; smooth finish
- Plywood: More durable and water-resistant than MDF
- Particle board: Budget option; less durable
- Marine plywood: Best for moisture resistance
- Solid wood: Premium but expensive
Finish options:
- Laminate: Wide color choices; easy to clean
- Acrylic: High-gloss finish; modern look; more expensive
- PU (Polyurethane) paint: Smooth finish; any color
- Membrane/vinyl wrap: Economical decorative finish
Components:
- Base cabinets: Floor-standing units with countertop
- Wall cabinets: Mounted on wall for upper storage
- Tall units: Pantry cabinets, appliance housings
- Drawers with soft-close mechanisms
- Pull-out units for corner cabinets
- Handles and hardware
Countertop materials:
- Granite: Durable; heat-resistant; popular choice (Rs. 150-450 per sq ft)
- Marble: Elegant but needs sealing and maintenance
- Quartz: Engineered stone; non-porous; low maintenance
- Solid surface: Seamless appearance
- Laminate: Budget-friendly; limited heat resistance
Wardrobes and Storage
Built-in storage maximizes space utilization:
Wardrobe design:
- Measure available wall space
- Plan internal layout: hanging space, shelves, drawers
- Include shoe racks, tie/belt organizers if needed
- Consider sliding vs. hinged doors based on room size
- Add mirror on door for functionality
Materials (similar to kitchen):
- Plywood/MDF with laminate finish
- Finish to match room design
- Cost: Rs. 500-1500 per sq ft
Other built-in storage:
- Bookshelves and display units
- TV units with storage
- Study table with overhead storage
- Loft storage in high-ceiling rooms
- Under-stair storage
- Shoe rack at entrance
Tips for interior work:
- Plan built-ins during design stage for better integration
- Ensure adequate ventilation in enclosed storage
- Use interior lights in deep wardrobes
- Choose easy-to-maintain finishes
- Don't skimp on hardware quality (hinges, drawer channels)
13. Final Inspection and Quality Check
Before moving in, conduct thorough inspections to identify and fix any issues.
Structural Safety Check
Verify structural integrity:
- Check for visible cracks in walls, beams, or columns (hairline cracks may be normal shrinkage, but wide cracks need investigation)
- Inspect beam-column joints for defects
- Look for signs of settlement or uneven floors
- Check if doors and windows open/close properly (structural movement affects these)
- Verify balcony/terrace railings are securely anchored
- Test staircases for stability
Hire a structural engineer if you notice any concerning issues.
Electrical and Plumbing Testing
Electrical checks:
- Test all switches and outlets
- Check all light fixtures and fans
- Verify circuit breakers trip correctly
- Test GFCI/ELCB functionality
- Check earthing system with tester
- Ensure distribution board labeling is clear
- Test doorbells, intercoms, and other installed systems
- Check for proper wire connections (no loose wires)
Plumbing checks:
- Run water through all taps and showers
- Check water pressure at all fixtures
- Flush all toilets and check tank filling
- Inspect for leaks under sinks and at pipe joints
- Test floor drains by pouring water
- Check hot water system functionality
- Verify all shut-off valves work
- Look for damp spots on walls or ceilings indicating hidden leaks
Other systems:
- Test HVAC/AC systems if installed
- Check water pump operation
- Verify solar systems work properly
- Test any home automation or security systems
Snag List Preparation
Create a detailed list of defects and incomplete items:
Common snags:
- Paint touch-ups needed
- Cracked or chipped tiles
- Gaps in caulking/sealant
- Door/window hardware not functioning smoothly
- Switches or outlets not working
- Plumbing leaks or drainage issues
- Uneven surfaces
- Missing or damaged fixtures
- Incomplete cleaning
- Missing items per contract
Document issues with photos and locations. Share with contractor for rectification before final payment.
Quality standards to verify:
- Flooring level and finish
- Wall smoothness and paint coverage
- Uniform grout lines in tiling
- Properly sealed joints (bathrooms, kitchen)
- Clean fixtures without scratches
- Neat electrical and plumbing work
- Properly fitted doors and windows
- Complete hardware installation
14. Completion and Handover
The final stage involves obtaining official certification and taking possession of your completed building.
Completion Certificate
The completion certificate (Nirmaan Sampanna Praman Patra) is an official document from the municipality confirming that construction is complete according to approved plans:
Why it's important:
- Legal proof that building complies with approved design
- Required for property registration
- Needed for electricity and water meter installation
- Required for property sale/transfer
- Necessary for building insurance
- Banks require it for loan documentation
How to obtain:
- Submit application to municipality with:
- Copy of building approval (Naksha Pass)
- As-built drawings (if changes were made)
- Photos of completed building
- Required fees
- Municipality inspects the site
- If compliant, municipality issues completion certificate
- Process typically takes 15-30 days
Start this process as soon as construction finishes; don't wait until you need it urgently.
Final Drawings
As-built drawings show the actual constructed building, including any changes from original approved plans:
What to obtain:
- Updated architectural drawings
- Electrical layout with circuit details
- Plumbing layout with pipe routes
- Structural drawings
- Any MEP system details
These drawings are invaluable for:
- Future renovations or additions
- Locating hidden pipes and wires
- Property sale documentation
- Insurance purposes
- Maintenance planning
Request both digital (PDF/CAD) and printed copies from your architect/engineer. Store safely with other property documents.
Maintenance Guidelines
Proper maintenance extends your building's life and preserves its value. Request or create maintenance guidelines covering:
Regular maintenance tasks:
- Painting: Every 4-6 years (interior), 3-5 years (exterior)
- Waterproofing: Inspect annually; reapply every 5-10 years
- Plumbing: Check for leaks periodically; service taps and valves annually
- Electrical: Test RCD/ELCB quarterly; check wiring every 5 years
- Doors/windows: Oil hinges annually; check seals and weatherstripping
- Septic tank: Clean every 2-3 years
- Water tank: Clean every 6 months
- Drainage: Clear gutter and drains before monsoon
Warranty information:
- Structural warranty from contractor (typically 10 years)
- Waterproofing warranty (typically 5-10 years)
- Electrical and plumbing material warranties
- Door/window warranties
- Paint warranty (1-3 years depending on brand)
Important contacts:
- Contractor details
- Architect and engineer contacts
- Electrician and plumber
- Supplier contacts for specialized materials
- Municipality office details
Create a building maintenance file with all warranties, manuals, and service contacts.
15. Common Construction Mistakes to Avoid
Learning from others' mistakes saves money and headaches. Here are critical errors to avoid:
Budget Miscalculation
Mistake: Underestimating total costs by forgetting indirect expenses or using outdated rates.
Impact: Running out of money mid-construction; taking expensive short-term loans; compromising on quality.
How to avoid:
- Add 15-20% contingency to estimated budget for unexpected costs
- Include ALL expenses: land, design fees, government fees, utilities connection, temporary facilities, interest on loans
- Get updated material rates before finalizing budget
- Account for price escalation (5-10% annually)
- Plan for change orders and upgrades
- Don't start construction without adequate funds secured
Poor Material Quality
Mistake: Buying cheap, substandard materials to save money.
Impact: Structural weakness, premature failures, expensive repairs, safety risks, reduced building lifespan.
How to avoid:
- Buy cement, steel, and other structural materials from reputable suppliers with test certificates
- Don't compromise on foundation and structural elements
- Verify materials meet relevant standards (ISI marks)
- Check physical condition: cement should be lump-free, steel should not be rusted
- Store materials properly to prevent quality degradation
- Balance economy with quality—save on finishes, not on structure
Common substandard materials to watch for:
- Weak cement with less than rated strength
- Rusted or undersized steel bars
- Soft bricks that crumble easily
- Poor quality sand with excessive silt
- Counterfeit electrical wiring and MCBs
- Cheap plumbing pipes that crack easily
Ignoring Soil Testing
Mistake: Skipping geotechnical investigation and designing foundation based on assumptions.
Impact: Foundation settlement, structural cracks, building tilt, potential collapse in extreme cases, very expensive retrofitting.
How to avoid:
- Always conduct soil testing before designing foundation
- Hire qualified geotechnical engineers
- Design foundation based on actual soil bearing capacity
- Account for water table level
- Consider nearby construction activity that might affect your soil
- Budget Rs. 30,000-100,000 for proper soil investigation
- Remember: Soil testing costs are tiny compared to foundation problems
Other critical mistakes:
Inadequate planning:
- Starting construction without complete drawings
- Poor space planning leading to dysfunctional layouts
- Ignoring future needs and expansion possibilities
Skipping approvals:
- Building without municipality approval (leads to stop-work orders, fines, demolition risks)
- Not checking zoning regulations
- Encroaching on setbacks
Poor contractor selection:
- Hiring based only on lowest bid
- Not checking contractor's previous work
- Unclear contracts without detailed specifications
- No payment schedule tied to work completion
Ignoring earthquake resistance:
- Not following Nepal Building Code requirements
- Poor beam-column joint detailing
- Skipping structural engineer involvement
- Using inappropriate materials
Inadequate supervision:
- Not visiting site regularly
- No quality checks during construction
- Allowing deviations from drawings
- Not documenting work progress
Weather neglect:
- Starting major work just before monsoon
- Not protecting fresh concrete from rain
- Inadequate waterproofing
16. Construction Timeline and Cost Overview
Understanding typical timelines and costs helps you plan realistically.
Average Construction Duration
Construction timeline for a standard 2000-3000 sq ft residential building in Nepal:
Stage | Duration |
Pre-construction (design, approvals) | 2-3 months |
Site preparation and foundation | 1-2 months |
Superstructure (columns, beams, slabs) | 2-4 months |
Masonry and roofing | 1-2 months |
Electrical and plumbing rough-in | 2-3 weeks |
Plastering | 3-4 weeks |
Flooring | 3-4 weeks |
Doors, windows, joinery | 2-3 weeks |
Painting and finishing | 2-3 weeks |
Interior work and final touches | 2-3 weeks |
Total | 8-14 months |
Factors affecting timeline:
- Design complexity: Simple box designs build faster than complex architectural designs
- Size: Larger buildings take proportionally longer
- Weather: Monsoon slows concrete work; winter slowing is less severe in Nepal
- Material availability: Delays in material procurement extend timeline
- Labor availability: Skilled labor shortages during peak construction season
- Site access: Difficult access slows material transportation
- Financing: Payment delays to contractors slow progress
- Changes: Design changes during construction add time
Commercial buildings generally take 50-100% longer than residential due to complexity.
Cost Breakdown Per Stage
Approximate percentage of total construction cost by stage (standard residential construction):
- Foundation and substructure: 12-15%
- Superstructure (RCC work): 20-25%
- Masonry: 8-10%
- Plastering: 6-8%
- Flooring: 8-12%
- Doors and windows: 8-10%
- Electrical work: 6-8%
- Plumbing and sanitary: 6-8%
- Painting: 4-6%
- Interior works: 10-15%
- Miscellaneous and finishing: 5-8%
Cost variation factors:
- Quality of finishes dramatically affects costs
- Location (urban areas more expensive than rural)
- Contractor margins (10-15% of direct costs)
- Design complexity
- Site conditions
Monitoring costs:
- Request monthly expenditure reports from contractor
- Compare actual costs against estimates
- Approve all variations before execution
- Keep buffer for genuine unforeseen expenses
- Don't release full payments until work is complete and verified
17. Tips to Reduce Construction Cost Without Compromising Quality
Smart strategies to build economically while maintaining good quality:
Smart Material Selection
- Use local materials: Locally sourced bricks, sand, aggregates are cheaper than transported materials
- Standard sizes: Using standard-sized doors, windows, and tiles avoids custom cutting charges
- Substitute materials: Consider alternatives like cement blocks instead of bricks where appropriate
- Bulk purchasing: Buy common materials like cement and steel in bulk for better prices
- Timing purchases: Buy materials when prices are low (track market trends)
- Direct sourcing: Buy directly from manufacturers or wholesalers, not retailers
- Quality balance: Use premium materials only where necessary (structure, waterproofing); economical materials for less critical areas
Local Sourcing
- Reduce transportation: Materials from nearby suppliers cost less due to lower transport costs
- Local labor: Workers from nearby areas cost less than those requiring accommodation
- Regional materials: Use materials traditionally available in your region
- Avoid imports: Imported materials carry customs duties, shipping, and markup costs
- Support local suppliers: Build relationships for better pricing and service
Examples:
- Source stone from local quarries rather than importing
- Use locally produced cement brands
- Hire local craftspeople familiar with regional construction techniques
Energy Efficient Design
Initial investment in energy efficiency saves money long-term:
- Orientation: Orient building to maximize natural light and minimize heat gain (reduces electrical costs)
- Natural ventilation: Design for cross-ventilation to reduce air conditioning needs
- Insulation: Proper roof insulation reduces cooling/heating costs significantly
- Solar water heating: Pays for itself in 2-3 years through electricity savings
- LED lighting: More expensive initially but lasts longer and uses less electricity
- Double-glazed windows: In areas with extreme temperatures, the energy savings justify extra cost
- Daylighting: Maximize natural light through proper window placement and skylights
- Rainwater harvesting: Reduces water bills, especially during shortages
Other cost-saving strategies:
Design optimization:
- Simple, rectangular floor plans are more economical than complex shapes
- Minimize number of corners and angles
- Efficient space planning reduces wasted area
- Standard ceiling heights (10 feet) are more economical than extra-high ceilings
Phased construction:
- Complete basic structure first
- Finish interior work in phases as funds become available
- Move into portions while completing others
Value engineering:
- Review all design elements for cost-benefit
- Eliminate unnecessary decorative elements
- Simplify complex details
- Use functional designs over purely aesthetic choices
Self-management (if you have time and knowledge):
- Hire labor directly instead of through contractor (saves 10-15% contractor margin)
- Manage material procurement yourself
- Supervise construction personally
- Requires significant time commitment and construction knowledge
Avoid these "savings" that backfire:
- ❌ Using less cement or steel than specified (weakens structure)
- ❌ Skipping waterproofing (leads to expensive leak repairs)
- ❌ Poor quality electrical wiring (fire and safety hazards)
- ❌ Thin foundation (causes settlement and cracks)
- ❌ Skipping soil testing (risks foundation failure)
Smart savings summary: Save on aesthetics and finishes, never on structure, safety, or quality of core systems.
18. Frequently Asked Questions
How long does it take to build a house in Nepal?
A standard residential house (2000-3000 sq ft) typically takes 8-14 months from start to completion. This timeline includes:
- Pre-construction planning and approvals: 2-3 months
- Foundation to roofing: 4-6 months
- Finishing work: 4-5 months
Factors that extend timeline:
- Complex architectural designs
- Difficult site access
- Monsoon season delays (June-September)
- Material supply delays
- Design changes during construction
- Larger building size
Factors that reduce timeline:
- Simple designs
- Ready-mix concrete use
- Pre-fabricated elements
- Experienced contractor
- Adequate funding
- Good site access
For faster construction, some builders use prefabricated elements or advanced construction techniques, potentially reducing time by 20-30%, though this may increase costs.
What is the average construction cost per square foot in Nepal?
Construction costs in Nepal (2024-2025) vary significantly based on quality level:
Economy construction: Rs. 2,500-3,500 per sq ft
- Basic materials and finishes
- Simple design
- Local materials
- Minimal architectural details
Standard construction: Rs. 3,500-5,000 per sq ft
- Good quality materials
- Modern finishes
- Concealed wiring and plumbing
- Some decorative elements
Premium construction: Rs. 5,000-7,500 per sq ft
- High-quality branded materials
- Designer finishes
- Advanced systems
- Detailed architectural features
Luxury construction: Rs. 7,500-10,000+ per sq ft
- Imported materials
- Custom designs
- Smart home systems
- Premium fixtures and fittings
Cost variations by location:
- Kathmandu Valley: Highest costs due to expensive land, labor, and materials transport
- Pokhara, Chitwan: 10-15% lower than Kathmandu
- Other cities: 15-25% lower than Kathmandu
- Rural areas: 30-40% lower but material availability may be limited
These rates typically cover materials, labor, and contractor margins but exclude:
- Land cost
- Architect and engineer fees (typically 3-5% of construction cost)
- Government approval fees
- Utility connection charges
- Furniture and appliances
- Boundary walls and external development
- Landscaping
For accurate budgeting, get detailed quotations from contractors with complete specifications and visit their completed projects.
Which is the best season for construction in Nepal?
Best seasons for construction:
October to February (Autumn and Winter):
- Best overall period for construction in Nepal
- Dry weather allows uninterrupted work
- Concrete curing happens properly without rain interference
- Clear skies facilitate outdoor work
- Good material availability as peak construction season
- Easier transportation of materials
March to May (Spring):
- Good construction weather but increasingly hot
- Can complete major structural work before monsoon
- Good visibility and working conditions
- Need to finish waterproofing before monsoon arrives
Seasons to avoid or plan carefully:
June to September (Monsoon):
- Rain disrupts concrete work (quality suffers if water enters fresh concrete)
- Difficult to maintain material quality (cement absorbs moisture)
- Slower progress due to weather interruptions
- Muddy sites make material movement difficult
- Higher labor costs as workers demand rain allowances
- If building during monsoon: Protect cement bags, cover concrete work, ensure proper drainage, plan indoor work during heavy rain
Construction activity planning:
- Foundation work: Best in October-November when soil is stable
- Structural work (columns, beams, slabs): October-April when rain won't interfere with concrete
- Roofing and waterproofing: Complete before May to prevent monsoon leaks
- Finishing work: Can be done year-round but painting during humid weather takes longer to dry
- Electrical and plumbing: Indoor work possible during monsoon
Year-round construction is possible with:
- Proper planning and scheduling
- Weather protection measures
- Focus on weather-appropriate activities
- Experienced contractors who understand seasonal challenges
Pro tip: Start design and approval process in June-August, begin construction in October to complete structural work before next monsoon.
Conclusion
Building a house or commercial property is a complex but rewarding journey. Understanding the complete construction process—from land selection and design through to final handover empowers you to make informed decisions, control costs, ensure quality, and avoid common mistakes.
Key takeaways:
Never compromise on soil testing, foundation work, anwaterproofing these prevent expensive future problems
- Obtain all necessary approvals before starting construction
- Follow earthquake-resistant design standards strictly given Nepal's seismic risk
- Budget realistically with 15-20% contingency for unexpected expenses
- Don't sacrifice structural quality to save money; economize on finishes instead
- Hire experienced professionals (architect, engineer, contractor) and check their previous work
- Visit the construction site regularly and maintain active supervision
- Document everything: contracts, drawings, changes, payments, warranties
- Plan for long-term maintenance from the beginning
Whether you're building your dream home, an investment property, or a commercial building, this step-by-step guide provides the foundation for a successful construction project. Take time in the planning stages, choose your team wisely, maintain quality standards throughout, and you'll create a building that serves you well for decades.
For complex projects or if you're uncertain about any stage, always consult qualified professionals. The investment in expert guidance pays dividends through better outcomes, fewer problems, and greater peace of mind throughout your construction journey.
This comprehensive guide covers construction practices common in Nepal as of 2024-2025. Always verify current building codes, material specifications, and local regulations with your municipality and licensed professionals before starting your project.